Camera Usage of Clear Filter mounted CDS-600D, CDS-1100D
*Optically polished Hoya MC clear filter installed.
![]()
![]()
Telescope + 2″ Astronomical Filter + Camera
![]()
Camera Lens + Camera
![]()
Camera Lense + 2″ Astronomical Filter + Camera
*Optically polished Hoya MC clear filter installed.
![]()
![]()
Telescope + 2″ Astronomical Filter + Camera
![]()
Camera Lens + Camera
![]()
Camera Lense + 2″ Astronomical Filter + Camera
[socialcompare width=”50%” height=”300″]http://www.centralds.net/cam/?p=1945#nofull;noflags[/socialcompare]
[sc]http://www.centralds.net/cam/?p=1952#noedit[/sc]
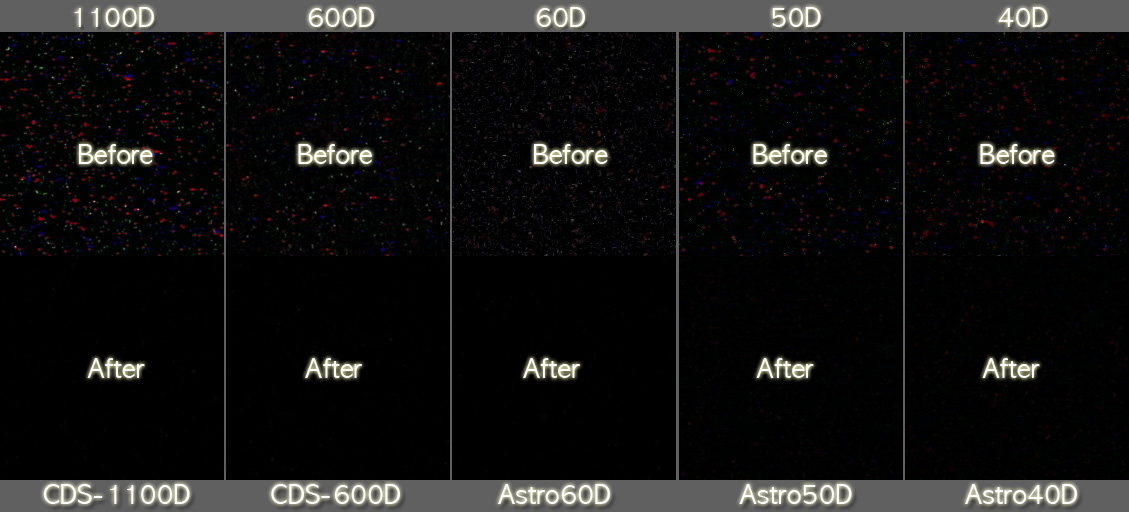
The images were taken at indoor dark room (Temperature : 20C~22C) and the exposure time was 450sec ( 7.5 minutes).We croped 224×224 pixels in center area of original images and not resized.
In order to distinguish the deferance of each shots more easily we stretched the tone levels in Photoshop program. The default value of highlight Levels is 255 and we stretched this to 30Levels. 자세히 보기
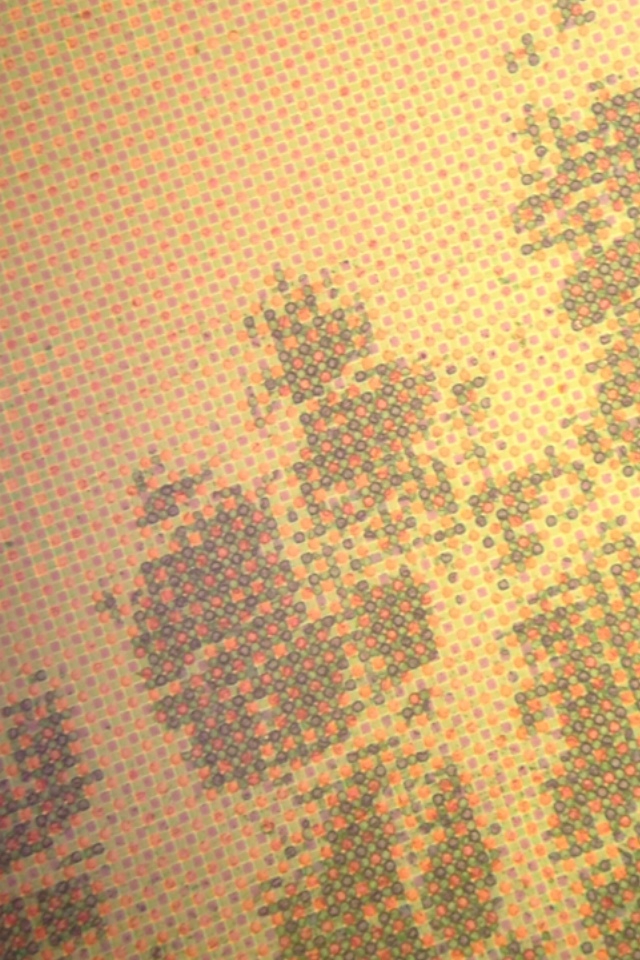
Microscope image of eos 40d CMOS sensor surface.
You can see micro lenses removed area and micro lens remainded area.
Dark area are microlens on CFA layer. 1unit of color Filter pattern is Green/Green/Blue/Red.
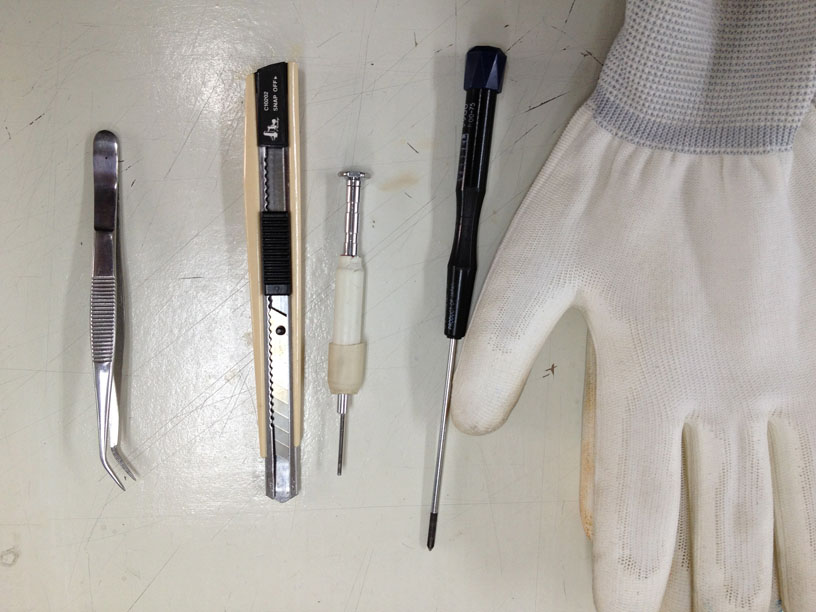
Prepare the tools and insulted gloves for the work.


Prepare double-sided adhesive tape for screw capturing. All removed screw must be stored in order.

Unscrew the 2 small hex screws.


You can see the folded cables at the backside of Excooler label removed.

Using pinset carefully and slowly pull out the heat shrinkable tube covered cable connections.


Please remove the shrinkable cable covering and capture the photo of the cable connections for safe reconnection.

Using soldering iron detach the cable connection. Remember the original cable connections.
Please attach the identification labels to the separated cables.

Remove two fixing screw at the LCD hinge .


Remove the hinge cover.

Remove the 3 screw on bottom of camera.


Open the battery cover and memory slot cover. Turn the LCD to 90degree.
\\\\\\\\\\\\\\\\\\\\\\\\\\\\\\\\\\\\\\\\\\\\\\\\\\\\\\\\\\\\\\\\\\\\\\\\\\
Hold the excooler housing firmly and lift up the back cover very very slowly.

Slightly open the back cover to exposure the LCD connector.

Release the FPCB connector from Main Board. Using pinset hold and Lift up.

Remove the back cover from the slowly. The separated cables must be arranged for reassemble.

Please check this connector . disconnect-> reconnect
Reassemble the camera.
Re-assembly process is the reverse order of disassembly.
Important things on your resemble work.
Check the connector coupling; LCD to M/B, trash button connector.
The right +,- soldering and insulation of temperature sensor, Peltier, Anti-dew heater cable.
I pray for your success in DIY repair. God bless you.

…(1) …(2) …(3) …(4) 냉각 DSLR History (5) 처음 페이지☞
구리 Skiving Fin 히트싱크…………………………………….06. 05. 27
 착탈식 쿨링유닛을 보다 콤팩트하게 하기 위해서 기존 시판되고 있는 컴퓨터용 쿨러를 찾아 보았는데 우선 CPU쿨러는 클럭수가 높아 발열량이 많아지면서 점차 대형화 되어가고 히트파이프제품이 주류가 되어가고 있었습니다. VGA쿨러중에서 작고 폼나는게 몇 있긴 했는데 테스트해보니 쿨링성능은 부족함이 많은지라 포기하고 결국은 구리히트싱크를 채용한 CPU쿨러중에서 효율높은 것 찾다가 대만의 쿨잭에서 나오는 슬림쿨러를 발견하였습니다. 두께 3~4mm의 구리판에 Soldering으로 냉각핀을 붙이는 방식이 많이 일반화된 방법인데 이회사제품은 두꺼운 구리판을 깍아올려서 냉각핀을 형성시키는 방법으로 히트싱크를 제조하여 열전달성능을 높이도록 하였더군요.
자세히 보기
…(1) 냉각 DSLR History (2) …(3) …(4) …(5) 다음 페이지☞
드라이아이스 쿨링 DSLR………………….05. 08. 29

Dry Ice Cooling Unit &CMOS 밀폐챔버를 렌즈 마운트 앞쪽으로 배치해서 설계했습니다.
옆의 사진에서 보면 사각형의 구멍이 드라이아이스 육면체가 들어가고 나오는 입구입니다.
드라이아이스 가게에서 28mm x 28mm x 28mm 80개에 6500원에 구입가능 했습니다.
보관은 스치로폴박스속에서 2일정도 가능하고 외기에 개방된 상태에서 1개를 넣고 30분정도 찍으면 높이가 1/5로 낮아지더군요. 외기와 차단하도록 조치하니까 2배이상 지속시간이 길어졌습니다. 단열피복까지 하면 지속시간은 더 오래갈걸로 기대됩니다.
길이 15cm의 FPC cable과 connector를 이용하여 저번보단 더 깔끔하게 CMOS에서 Mainboard까지를 연결했습니다.
FPC cable은 다행히 32핀,1.0mm피치에 길이 15cm짜리 물건을 구할 수 있어서 기존 CMOS의 FPCB 와 맞춤으로 작업할 수 있었습니다.
케이블이 지나는 각 경계면(CMOS Chamber >Dryice Chamber >camera Body)은 실리콘 코킹으로 sealing하였습니다.
Cable의 배선을 위해 카메라 Body의 미러는 위로 올려서 고정하고 셔터막은 제거하고 그 열린 공간을 통하여 케이블이 통과되도록 하였습니다.


